Connecting a few different pins (with a wire, to short circuit them) gives the same effect. I’ve marked them in the photo below…
Pink lines show where to short across the pins to get the effect in the recording. There are 4 different wiring options shown here - just choose one!
These bends don’t affect movement at all. Though I’m happy to have found these ones – and think they’ll sound great when amplified – it’d be nice to have some movement loops too…
I’ve not really got organised properly with this yet, but did stumble across a short-circuit yesterday that locked some of the motor stuff into a loop.
Talking to the furby or pressing the belly or back switches doesn’t break the loop, so at the moment it looks like the only way to interrrupt the cycle is to turnitonandoffagain.
Whilst there’s quite a few resourcesavailable online to help out with any planned circuit-bending of a regular furby, I’ve been unsuccessful in my searches for information relating to circuit-bending their larger relative, the Funky Furby.
This is probably one of the reasons why the purple and green critter I picked up at a carboot sale over the summer has been sat on my hack-shelf for so long, without even so much as having had fresh batteries put in it.
It is also the reason why I’m going to document as much of the process here as I can, starting with today’s instalment: de-skinning.
The first task is to remove the feet. This is likely to be the biggest hurdle due to the need for a triangular-shaped screwdriver. If you’ve got that (and a normal, small-sized cross-head screwdriver), then the rest is really quite straightforward.
The inner screw that joins the feet to the main body
After removing the two screws in the base of each foot, you can lift off the fleshy toe bit to reveal a second, black mount. This is where the feet connect to the main body, so you’ll need to remove these too. Once you have removed these (the screws are quite long) put all the foot parts and screws to one side – you’ll need these again later.
Under the feet
Removing the black mounts reveals a panel of plain material (rather than fur) with a small hole in it. If you poke around through this hole, back in the direction towards the battery compartment, you should be able to hook a finger (or maybe a screwdriver) under the black plastic strip that is sewn onto the white cloth along the corner edge where the battery compartment sticks up. Pull hard to undo the clip and free the fabric.
The tabs that hold the fabric in place around the base
The tabs that hold the fabric in place around the base
Some of the tabs on my furby came out ok, but one or two snapped. Your mileage may vary…
After that, it’s a case of gradually peeling the fur up over the top of the furby.
Skin peel
It’s easiest to work up over the back and bring the pelt over the front of the face. There are a few more of those tab things, and a few other places where you need to unhook bits and pieces, but you don’t need to snip any of the stitching or anything around the face plate – the aim is just to clear the fur layer from the back half of the shell and any of the articulated bits coming out from the inside of the shell.
The tips of the ear levers need to be unpopped.
The eyebrow elastic needs unhooking from here
Once you have done this, you can unscrew the two halves of the shell and the fur, still attached by the face plate to the front half, can just stay how it is. The microphone is attached to the front half of the shell – unscrew this so you can remove the furby innards completely.
Furby innards revealed
From here you can reattach the feet to give the little critter some stability and then you can do whatever you’re going to do with the electronics…
Kind of cute...
Circuitboard easily accesible on the side
As I said, I haven’t found any references for bend points, so there’s a high chance the furby won’t make it through the next stage where I noodle around on the circuitboard looking for glitches. I made sure to get some video of him doing his stuff before I went any further:
…after which I did actually Read The Manual and found out that you have to play music at it for it to dance!
I need to rig up some sort of jig or stand to hold the furby off the ground for the next stage – triggering sounds also means triggering movement and that makes it really difficult to work on the circuitboard to try and find the bends.
Hopefully the furby will survive long enough to have something to put in the next of what is planned to be a series of posts documenting the circuitbending process…
In the second of my two interviews this week, I was invited by Whitmore Park Primary School in Coventry to help them look at ways to develop their children’s skills as active learners in mathematics.
With only a day and a half’s notice for the interview – which required me to design and deliver a ten minute activity with a group of pupils – the only sensible thing to do was not only to figure out the content of the activity, but also to embark on constructing a technological doohickie, the workings of which I had no prior experience in! Well, it’s all good learning, isn’t it?!
The things I wanted to achieve through the activity were:
To have the activity pupil-led as much as the restrictions in time would allow.
To use a medium that highlighted a ‘special’ technical skill that I could contribute to the mix – ie something not likely to already be available or in use within the school.
Something that felt to me like it was a genuine activity, and not too much like ‘maths dressed up’.
Something with a bit of ‘wow’ to it.
Riffing of something I had referenced in my application, I decided to do something based on code-breaking, but I wanted this to involve a physical object – one that would respond when the code had been broken. This, I felt, would give me a chance to make something using my hack/electronics skills which, whilst not being up to much in the grand scheme of things, should be adequate enough to impress a 9 year old…
After much searching of Instructables and Hackaday looking for the right combination of inspiration and cold, hard instruction, I decided to work with a system for recognising sequences of knocks in order to open a box. For this I am deeply indebted to Steve Hoefer’s detailed documentation of his Arduino-based Secret Knock Detecting Door Lock, which I only modified slightly to take into account the resources I had available.
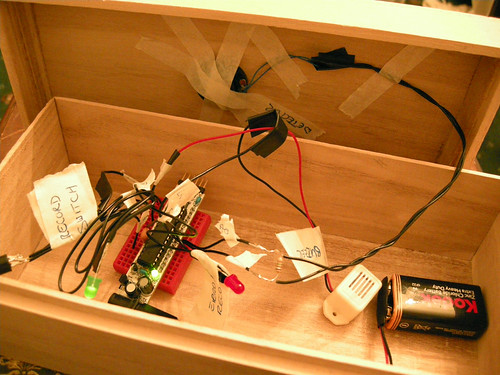
Secret knock box gubbins: components labelled up to facilitate explaining what they were for, free ends of wires labelled up so that they could quickly be replaced in the right row of the breadboard if they accidentally came out...
Since it was only a ten minute activity, I decided to leave the components on the breadboard, rather than permanently soldering them up. It was also for this reason that I was reluctant to drill holes in the box I had acquisitioned to use as the casing. The downside of this being that there wasn’t really much in the way of a feedback mechanism, because the LEDs were not visible. As a compromise, I fitted a buzzer in the place of the door-knob opening motor so that the box would buzz when the correct knock was given. I also implied a lock through the way that I introduced the box and handled it in front of the children.
When it was time for the kids to go into action, I reverted to the now familiar Agent N role and gave them an introduction that indicated that they were a specially selected team of code-breakers and we’d been given a mission to investigate this box.
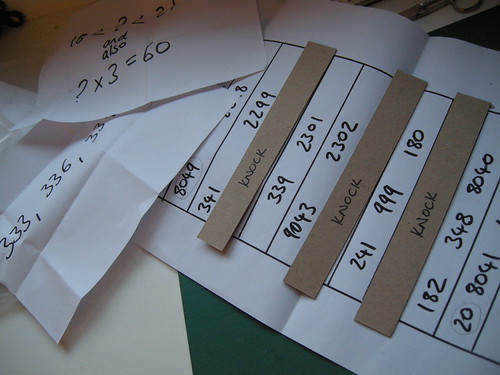
I had some vague knowledge about such things, but I certainly didn’t hold any answers. After telling them they needed to find the secret knock, I handed them two folders containing stuff that might be clues and asked to “please tell me what you think”… I encouraged the children to help eachother out, and also to offer lots of different ideas and hypotheses.
A selection of clues from which the children successfully built up and interpreted a diagram of the secret knock's rythmn.
From there I nudged and guided, seeking to let the pupils make the connections between the different clues wherever possible. We just managed to open the box in time!
The session was a bit slower and lower energy than I had imagined it would be. On reflection I think this was as much to do with nerves and shyness on the part of the pupils (I was the first artist they were interviewing) as much as anything in my control. Certainly the three children who had previously accompanied me on a tour of the school seemed more relaxed and outgoing than the others who had only just met me. The nice moment was when the Deputy Head came back to the room and asked what they had done. The description they gave, with no input from me, was spot-on and showed a sophisticated understanding of the principles involved.
Given the opportunity, I would love to expand this into a much longer activity in which we could solve the initial code, investigate how the box works and then – because obviously the code was too easy – reprogramme it with another knock and get the children to invent ways of codifying that information in an even more fiendishly difficult manner…
So far my 2010 has been very focussed on schools and learning as I first spent a week responding to the second wave of Creative Partnership calls for this academic year and then attending interviews as a result.
Roughly half of the interviews I am invited to involve having to deliver a short activity (10-20 minutes) to a small group of the children. Considering my whole approach to projects is based on collaboration and a particular process aimed at responding to each individual context, it’s quite strange to find myself being judged on solo delivery of something workshoppy to a group I’ve not had any previous contact with!
I’d like to think that with my cross-disciplinary background one of my main selling points is that with pupil-led projects I’m pretty well equipped to be able to bring in practical skills that relate to wherever we end up. This too makes it tricky to decide on just one activity to represent me, because I’m not working from a starting point of offering a particular medium in response to a brief. Again all about the process.
Anyhoo, irony of the situation aside, these activities can be very interesting in their own right.
On Monday I was in a school that was looking for someone to help facilitate Year 5 (9-10 years old) in designing and making their “Museum of Water”. I was really interested in this call because of the way it had been presented as very pupil-led and also because, through my work with pervasive games and hackerspaces, I’ve been involved in various conversations coming from museum professionals that resonate strongly with those of schools. We all want meaningful interactions.
15 minutes isn’t really enough time for introductions and then anything much in the way of making, so I decided to aim for something much more feasible …like a paradigm shift!
I wanted the school to see their museum-to-be not as a collection of objects, or of documentation of learning objectives, but as a process. People go into the museum and the museum has some sort of effect on them such that the people leaving the museum are slightly different to when they went in. Otherwise, what’s the point?
I started the session in my favourite manner – by getting things wrong.
Hi, my name’s Nikki and I do all sorts of creative stuff. I’m here because I saw your advert for someone to help you make a Museum of Water.
Well, I thought that was really very easy, so I just went ahead and made it for you. [places 2 litre lemonade bottle partially filled with water on table]
Can I have my £3000, please?
[Silence]
Oh, hang on!
[Places bottle on top of cardboard box pedestal]
[Silence accompanied by glances]
What’s wrong? Can I have my money please?
From this starting point, we were able to have a conversation where the pupils explained to me that, even if I labelled the water, just to have a bottle of water on display wasn’t good enough – they wanted a museum that was interactive and taught people interesting things. They weren’t very impressed with my offering at all.
My next move was to invite everyone down to the other end of the room where I had cleared some floorspace. Within the context of what they had just told me, I introduced the idea that I wanted them to think of their museum as an experience machine. I wasn’t interested in what was inside it right now, but I wanted to think of who went in, and what we wanted them to be like when they left.
Quick profiles of incoming and outgoing museum visitors
Two of the children lay down on some large pieces of paper and struck appropriate poses whilst we drew around them. First of all we gathered around the outgoing visitor and noted and sketched our thoughts about what we wanted people to be doing and feeling after visiting our museum. I was really impressed at the contributions made in what I think was less than 5 minutes.
At one point I announced I was going to write down the obvious and added “happy”. This triggered a conversation about whether we would ever want people to leave the museum feeling sad. Yes they said: there were some very serious things relating to the topic of water and they might want people to be moved by these. When I asked for an example, one boy said that sometimes people drown in water. We agreed it would be important to teach people how to be safe.
With very little time left, we quickly added some thoughts to the picture of the incoming visitor. These were very illuminating in terms of how they perceived museums. Or how they thought museums were perceived – anyway, a very stark difference to the very positive picture they had painted in the previous two activities!
And that was the end of the session ..or it was supposed to be: it took a bit of effort to get the children to stop adding to the picture!
A few pupils helped me take photos of the drawings before I departed (I left the originals with the school – along with the bottle of water, for which I kindly waived the £3000 fee). Below is a slideshow of some of the images…
They’ve set themselves some very high standards in light of what appears to be a somewhat challenging target audience – I hope they can realise them.
I’d be really interested in hearing more about who you consider your influences or precursors in installation art – I’m vaguely drawing up an enormous Flowchart Of Pervasive Games And Where They Come From And All That Sort Of Thing, which is obviously never going to be even slightly exhaustive but which might be fun to have around. I don’t have much from installation art there – any suggestions?
I was pretty rubbish for about the first 2 of my 3 years doing A-Level Art and Design, so I’m guessing this happened in about 1996/7, after a certain rollicking from Hillary regarding some lino prints got me thinking more about process and journey.
I got the train up from Southampton to London to Go And Look At Some Art. I think what I did was to rock up, find a newsagents, have a flick through Time Out and see what looked interesting. …and so I ended up in somewhere I think was probably Mile End.
This was a part of London I’d never been to before and it was all pretty scary. When I finally found the address given in Time Out, the building was big, not at all what I was expecting (like an old town house or civic building of some sort) and very locked looking. In fact, very boarded-up looking…
After a bit of hesitation and hopeful looking around for any indication at all that this might have been a gallery, I plucked up the courage to ring the buzzer indicated by a note attached to the door that might have been referring to the art I was seeking. When the door was opened, and the correct place had been confirmed, I was led inside and it became apparent that the building was well on its way to becoming derelict: I was guided around holes in the stairs and there were bare floorboards and bare wires.
A few storeys up, we came to a door with a small wooden chair placed next to it.
I was to go inside and be careful. The man would be waiting for me outside.
The dark room I stepped into was one of those where there would ordinarily have been 3 or 4 steps down from the door to floor level. However, the artist had constructed his own floor that began at door level and then cut through the room sloping both up and away towards the back of the room and also from left to right. The new floor was made of metal grill, so as my eyes became accustomed to the dark I could begin to make out the cables snaking across the original floor below, a couple of vertical columns piercing up through the grill from below and also some faint light associated with those columns.
I slowly made my way across the metal structure, all the while aware of my location in the middle of the room. Approaching and then looking down into one of the columns, it became apparent that there was a monitor at the bottom showing some video. I can’t remember much about the video, except my impression is that it was a blueish monochrome and the images might have been abstracted shots of human bodies. I don’t recall there being a narrative or a soundtrack (although there might have been sound).
…and that was it, really: a wonky floor and a few monitors you could look down on through rectangular tubes. I was in there for so long that the artist sat waiting outside was wondering whether he should come in and check on me!
When I did finally leave the room, I was invited to chat with the artist for a little while. I’m not sure if he and the other artists working in the building were squatting or not, but he was living – for the time being at least – in a small room not much bigger than the mattress on the floor and cooking from a primus type thing in the corner.
We talked for a bit and then I left to continue my day of art-looking.
I don’t remember anything else I saw that day.
I do, however, remember telling the story of seeing that installation over and over again when I got back to college. My tutors were concerned that I had put myself in danger, and in retrospect I probably had. Fortunately though, it had all worked out fine and for the last year of that A-Level my work was predominantly installation-based and so much the better for it.
***
So, an experience of installation art that had a big influence me. If we’re drawing lines from that day to my thoughts and doings with pervasive games now, it would be tempting to label them thus:
Following a scrap of tempting information into the unknown.
I’ve been threatening to use time over the Christmas holidays to get to grips with Scratch, a programming environment aimed at young people. I’ve been curious about it for a year or so and have recently had some conversations with people who have practical experience of using it in schools that has inspired me to actually get on and investigate it.
Coding blocks in Scratch
I’m thinking that to start off with I’m likely to apply it to animation-themed projects – you just don’t see briefs asking for people to come in and teach kids how to code! Shame that: beyond systematic approaches, applying mathematical concepts etc etc, I think there’s something particularly valuable in the process of debugging that can be applied to wider things. Fits in with my thoughts about protovation and creativity.
Anyway, as ever with these freestyle learning things, it can be a bit tricky to conjure up mini-projects to provide an impetus. Fortunately though I’ve had a huffing duck to work with and then an escaped bull went for a wander around Balsall Heath.
Balsall Heath, bull and the Shouty Lady
I lived in Balsall Heath last year, so I kind of got a bit distracted by the backgrounds and distilling some key landmarks into simple graphic form, rather than designing a game, as was the original intention. Still, there was a lot to be learned in just getting the background tiles to scroll as the bull works its way up Moseley/Alcester Road. [Addendum: This whole thing probably won’t mean anything to you if you don’t know the area. If that’s the case, here’s a link to the Google Street View to give you a toehold.]
Moseley baths
After some wrangling as to whether I was going to make it a shoot-em-up in the style of the real-life story, I eventually decided that that wasn’t a route I wanted to go down (well, it is Christmas!) so the hazard comes in the form of the Shouty Lady.
One of my overall impressions of living in Balsall Heath was that there always seemed to be people shouting in the streets. Not increased-volume-so-my-mate-over-there-can-hear-me shouting, but full-on screechy argument shouting at the person stood right by them, or perhaps now walking on the other side of the road. After a few months I began to recognise that, more often than not, it was the same woman doing the shouting…
So, in the Balsall Bull ‘game’ the Shouty Lady will appear at random intervals and potentially scupper your overall aim of getting to the curry house.
Scratch isn’t set up for embedding per se, but I’ve put Balsall Bull on a separate page so you can have a play if you’d like to. If you don’t see it on the page, you’ll need to download and install Java to be able to run the applet thingy.
To play Balsall Bull, use the arrow keys to guide the bull along the road, click the green flag in the top right corner if it goes sqiffy and, above all else, beware the Shouty Lady.
In the final of my three years of doing Art and Design at A-level, I found my groove working with installations. I remember a hut I constructed on and around the railings at the top of the stairs to the department office, where you had to weave yourself through small openings before clambering into a small chamber with a computer running a sort of hyper-linked labyrinth of loosely associated words and images.
Another vivid memory is of being hidden behind a curtain in a blacked-out teaching hut, waiting for the right moment to connect the wires to the car battery and start the projection screen rotating.
An outdoor piece involved the construction and installation of periscopes around the college campus, revealing new views over roofs and around corners. Nice moments of interaction with people at either end.
Games
I’ve recently come to think of the pervasive games work I do – and the way that I do it, and the why that I do it – as being an expanded mode of installation art. The key concerns around affecting perception of space are still there, just I’m now planning around a much more complex and dynamic system. More variables. More risk. More interesting?
Sensors
Through involvement with the fizzPOP hackerspace, I’ve been thinking about more traditional formats of installation again, this time using sensors to make the spaces responsive to the people within them.
A new year’s project is going to involve using a violin to ‘play’ graphics via movement on a macro and micro scale, but in my mind’s eye I can also see some of Atsuo Okamoto‘s stone carvings theramin’d up in a dark barn somewhere. A solitary experience. You interacting with the mass of the stone without touching it.
Othello
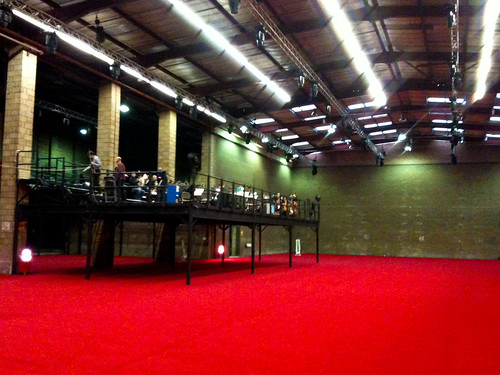
'Orchestra Platform' by Pete Ashton on Flickr
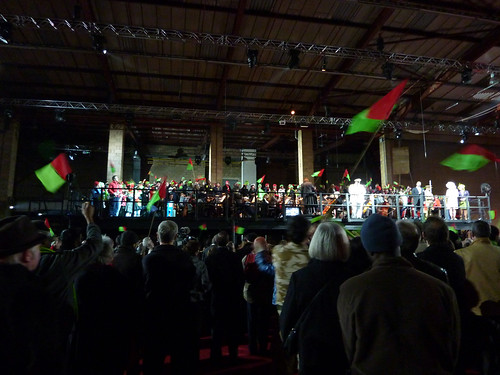
Last night I went to see took part in Birmingham Opera Company‘s production of Othello. It was marvellous and impressive in so many different ways (Pete’s index of reviews) but the thing that really struck me was the way in which, in a space that was empty bar for the orchestra’s platform, the audience was moved around to effectively create different sets and scenes. From being penned in shoulder-to-shoulder with a few other hundred people looking up at the actors above through to sitting against the walls watching Desdemona across a vacuum of red carpet.
The way so many of us were were all steered so effectively by cues visual, audible and physical was masterful. There’s something here that fits in with the thread of installation thinkings. Massively multi-player installation perhaps?
This year I’m working with Dean the Art Wizard and 20 ‘Gifted and Talented’ [a definition here] Year 10 pupils from King Edward VII Science and Sport College. The pupils will spend some time developing projects before going as small groups of Science Ambassadors into feeder schools and running activities with younger children. As part of National Science and Engineering Week in March, they will also host activities at King Edward’s as part of an open evening.
Yesterday Dean and I spent the whole day with the soon-to-be ambassadors: we introduced our practices and I did a presentation around the theme of materials selection in sport. Dr Lewis, the science teacher we are collaborating with wanted the project to use recycled (reused?) materials and to tie in with the Olympics, so we then presented the pupils with a pile of junk materials and the challenge to design a sport to take into the feeder schools as an activity.
We used an iterative process of first generating wild and exciting ideas and then over a few more passes eventually distilling these down into things that kept the kernel of what made the original ideas exciting, but were realistic for taking into primary schools and doing with a few classes of young children over a couple of hours.
We finished off by documenting the process and by starting to write up rule-sets for the new sports.
The Year 10 pupils will me a few more times to refine their projects and then Dean and I will accompany them into about 6 different schools to roll out their activities. I’ve no idea what to expect.
Generation of initial ideas
Introducing the new sport of hockegg
Principles of box jousting explained
Making prototypes
Making prototypes
CD and bubblewrap wheels are attached to a racing cart
My main area of enquiry is centred around interactions between people and place: often using tools and strategies from areas such as pervasive games and physical computing to set up frameworks for exploration.
If you'd like to commission me or collaborate with me, please get in touch via the contact page.
General blog contents released under a Creative Commons
by-nc-sa license.
Artworks and other projects copyright Nicola Pugh 2003-2026, all rights reserved.
If in doubt, ask.
The theme used on this WordPress-powered site started off life as Modern Clix, by Rodrigo Galindez.